Sunday, February 13, 2011

Valentine Heart Crayons


Valentine's Day is a big day for kids over here and it's usual to send cards in for the whole pre-school class. This year I decided it would be fun to try and make something so Freja and I decided to give heart-shaped crayons a go. I bought some heart-shaped ice cube molds from the dollar section in Target and a big box of crayons. We're not big crayon people in this house so we didn't have any spare to use, but this could be a good way to use up old crayons if you happen to have some.

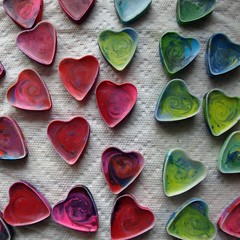
The first thing we did was remove all the paper and break the crayons up into small pieces. We just went for as small as we could do with our hands. We tried to fill the molds up so they were pretty full but without having any bits hanging over the edges of the shape. We went for some red, pink and purple, and some blue and green.


Next I put the molds on an old baking tray, poured a layer of water on it and stuck them in a low oven set at 200F/ 93C. I watched them closely until they had completely melted, about 10 minutes. (This pic shows them about half-way through, I waited until there were no visible lumps).

I took them out of the oven to cool and gave each one a little swirl with a bamboo skewer.


Once they were cooled we put them into these little plastic heart boxes which are also from the dollar section in Target.


Labels: , , , , ,

Tuesday, February 2, 2010

Felt Danish Heart Purse Tutorial

I've always loved the look of woven paper Danish Christmas hearts and when I saw these felt ones on the Felt Cafe blog the other day I was inspired to have a go at making one in felt myself. I decided to turn it into a small purse and here's how I did it...

You will need:

Two colours of felt, I used some felted sweaters. Approximately 4" x 12" each.
Some fabric for the lining. Approximately 4" x 12".
Needle and thread.
Button.
I used a sewing machine for the lining but it could be done by hand.

An internet search for Danish Christmas heart will bring up lots of directions on how to assemble these hearts so I'm not going to go into huge detail here. This is the link from the Felt Cafe blog. There are some very fancy designs out there but I decided to start with the simplest possible one.

You could cut out a template to use as a pattern, or wing it like I did. The shape you need is a square (mine was 3.5" wide) with a semi-circle added to the top edge.

Fold your felt in half and lay the pattern on the the felt so that the bottom edge of the square is on the fold. Cut one piece (on the fold) from each colour. Make two equally spaced cuts from the folded edge, through both layers of felt, just slightly longer than the square.

Weave the two pieces together thinking about weaving through the loops rather than up and over them.

To make the lining cut out a piece of fabric the same size as one of your pieces of felt. Iron one of the long edges over by about 0.75" and then fold in half longways with the right side in. Stitch along the remaining sides about 0.5" from the edge. It's probably best to try and make sure the fit is right before you sew it as I think different thickness felt would need a slightly different sized lining. Trim with pinking shears close to the stitching.

Decide which side you would like to leave open and fit the lining into the heart so that the open edge is across the rounded part of the heart on that side. Stitch the lining to the felt around the whole opening by hand. Now stitch the other rounded side of the heart closed along the edge, and continue stitching all the way around the heart shape to give it some stability. You could use blanket stitch and contrasting thread but I decided to try and match my thread so you couldn't really see the stitching.

Cut a button hole in the top flap of the open side and stitch a button to the inside of the back flap.

Give to your three-year old daughter so she can fill it with small rubber princess clothes.

If you do make one I'd love to see pictures.

Labels: , , , ,